I finally got a camera that doesn't drive me crazy that I do do videos with. It's not THE camera that I want but it does the job and it only cost me $30. (gotta love those ebay deals!) So, without further mumbling from me here is my 1st tutorial video with me actually talking while recording.
Paper beads and foil tutorial
It's just a shorty of how I make paper beads with foil accents. Hope you like and and if you do please give me a thumbs up.

Showing posts with label tutorial. Show all posts
Showing posts with label tutorial. Show all posts
Monday, March 24, 2014


Sunday, January 15, 2012
Creative Paperclay® Heart pendant
My newest tutorial using Creative Paperclay®

Thanks for stopping in and I hope you enjoy the tutorial.
Material list:
Creative Paperclay®
wire - for the bail
tool to stamp in your texture
acrylic paints
1. Make a paperclay ball, about the size of a walnut. Actually, the amount of clay you use really depends on the size you want your finished piece so play around. If you use too much simply make the ball smaller and reshate again.
 2. Start shaping the clay into a heart. I first roll the ball in my hands to form a cone shape and then squish and moosh the clay into a heart shape. This is play time so have fun and don't worry if your heart isn't a perfectly shaped heart. I kinda like the wonky look, I think it gives the pendant more character.


3. Insert your wire bail into the top of your pendant. Since mine is a wonky heart I inserted the bail so the heart will hang at an angle


4. Next we stamp in our texture. I used a leather stamping tool for my texture but you can use whatever you have handy. Stamp the texture deep enough to make it look like it's inside the heart, not on the surface of the heart.


5. Once you get the look you like let the pendant completely dry. What? We're done? Yep, how easy is this! :)
6. After it dries completely you can paint it . I started by painting the entire pendant black. I then dry-brushed metalic gold and red. That gives the pendant an aged look that I love. After the paint dried I sprayed a couple of layers of polyurathane on it to protect the paint. All that's left to do is sting it on a cord or ribbon and you have a beautiful heart to wear.


Thanks for stopping in and I hope you enjoy the tutorial.
Material list:
Creative Paperclay®
wire - for the bail
tool to stamp in your texture
acrylic paints
1. Make a paperclay ball, about the size of a walnut. Actually, the amount of clay you use really depends on the size you want your finished piece so play around. If you use too much simply make the ball smaller and reshate again.


3. Insert your wire bail into the top of your pendant. Since mine is a wonky heart I inserted the bail so the heart will hang at an angle


6. After it dries completely you can paint it . I started by painting the entire pendant black. I then dry-brushed metalic gold and red. That gives the pendant an aged look that I love. After the paint dried I sprayed a couple of layers of polyurathane on it to protect the paint. All that's left to do is sting it on a cord or ribbon and you have a beautiful heart to wear.

Tuesday, November 15, 2011
Thanksgiving Turkey Pin Tutorial
Good Morning everyone! Today my first "official" tutorial as a member of the Creative Paperclay® Design Team posted.
 Hope you have fun trying my tutorial.
Supplies you'll need:
Creative Paperclay®
Craft Glue
Black bead for eye. (I used a black onyx round bead)
Pin Back
Your sculpting tools
Something to roll the clay out with
Paint brushes
Acrylic paints (I used French Vanilla, Dark Brown, Black and Metallic Copper but feel free to choose the colors you like!)
Water
Strong Glue for pin back (I use E-6000)
Protective Urethane spray
Okay, let's play!
 Step 1. Grab about a golf ball size of clay and role it out to about 1/8 inch thick. I use bamboo skewers to rest my roller on while rolling out the clay. Next, cut out 11 circles to make the tail feathers with. If you look at the picture you can see I used what looks like some really nice cutters. What they are are those brass candle stick inserts you use to help keep wax off the lip of your candle sticks. You can find them in several sizes and they come in a pack of 5 or six. They work great are are inexpensive clay cutters! Or you can eye ball it and make 5, 1/2 inch balls and 6, 1/3 inch or so.


Supplies you'll need:
Creative Paperclay®
Craft Glue
Black bead for eye. (I used a black onyx round bead)
Pin Back
Your sculpting tools
Something to roll the clay out with
Paint brushes
Acrylic paints (I used French Vanilla, Dark Brown, Black and Metallic Copper but feel free to choose the colors you like!)
Water
Strong Glue for pin back (I use E-6000)
Protective Urethane spray
Okay, let's play!


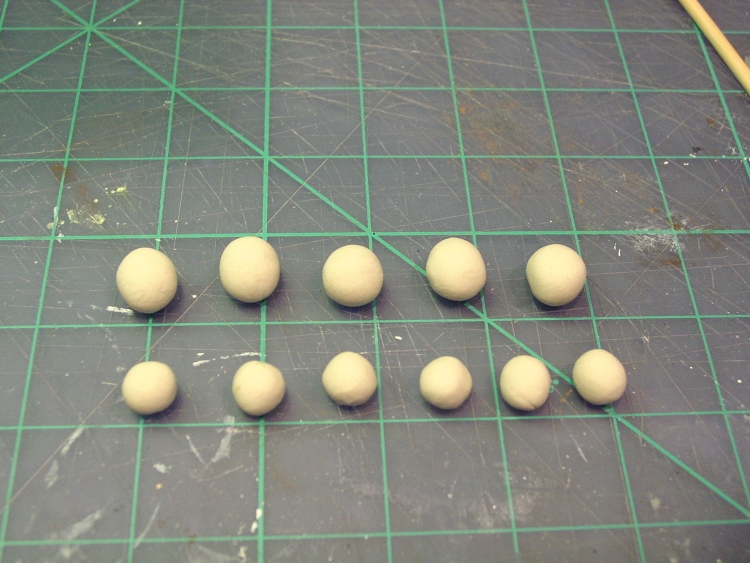
Step 2. Now take all those nice clay balls and roll them into cone shapes about 1 1/2 inches long.

Step 3. Lay all your clay cones out into the shape of the tail feathers and gently flatten a bit. Don't worry if the bottoms don't match, you're going to trim them next.

Step 4. Now trim the bottoms of your feathers to make a nice curved arch.

Step 5. Time for a bit a detail. You can use a toothpick or a tool with a straight edge to add details to the tail feathers. Don't push all the way through the clay, you just want the lines deep enough to hold onto the dark brown paint later. Now let the tail feather dry a bit, you don't want to squish out all your lovely work.

Step 6. After the tail feathers have dried a bit it's time to add the rest of the turkey. Make a ball of clay a little bit smaller than the size you want the body. Before pressing it in place, brush a little bit of craft glue along the bottom edge of the feathers to help the body stick. Now press the ball in place and shape it till you like the way it looks.


Step 7. I added feather details to the body with a silicone tipped sculpting tool but you can use a piece of wire bent into a U shape to stamp feather impressions into the body.

Step 8. Next we'll make the turkey's neck, head and the wattle. The WHAT? LOL. The wattle is that hangy down thingy on the turkey's beak and neck. (I didn't know either so I looked it up!) Just make a snake shape, give it a little curve, paint a little glue on the back and press in place. The head is a flattened ball of clay with one edge pinched out a little for his beak. The wattle (teehee) is a tear shape press in place. Don't forget to paint a little glue on the back of each piece before pressing into place.


Step 9. Here's lookin at ya! Add a little glue to your bead and press it into the head.Now let this all dry. If you're like me and you can't stand to wait a few hours do what I do. Warm your oven to 200 degrees. Turn oven off, place your turkey pin in oven on something flat, like a cake pan and leave in oven till dry. Keep an eye on it though, in case it starts to crack or bend.

Step 10. Now that your pin is dry you can add the nice smooth bottom. Roll out a chunk of clay to about 1/8 inch. Paint glue all over the back of your pin and then gently press the turkey onto the rolled out clay. Trim all the extra clay away from the pin and smooth the edges. Let dry again.


Step 11. Once your pin is completely dry you can paint it in the colors of your choice. Once your paint is dry, thin your dark brown paint just a little with water and then paint over small sections at a time, making sure you get it into all those wonderful details. Gently wipe off with a damp cloth or sponge before it dries. I use a makeup sponge for this. They work great and are soft enough that they don't pull of any of the other dried paint. This helps pop out your details.
You can spray a protective coating on your pin after it is completely dry. I used a matte finish by Krylon.


I hope you enjoyed my Thanksgiving Turkey Pin tutorial. I had fun creating it for you!
Tuesday, October 4, 2011
Creative Paperclay Snowman ornament tutorial

With the Christmas season just around the bend I decided to share my method of creating adorable Snowman ornaments using Creative Paperclay ®. I love working with this versatile medium.

You can find out more about it here, Creative Paperclay and on their blog Creative Paperclay blog
So, here we go! First let's gather up the materials you will need.

Materials
Creative Paperclay ® Air dry modeling material
Foam Core board
Exact-o knife
Wire and wire cutter
Masking tape
Wooden skewer or toothpick
Wooden skewer or toothpick
Craft glue
Gesso (not necessary but I like using it to prep surface for painting)
Acrylic paints (I used white, black, orange, light blue, light pink and medium brown for antiquing)
Various sculpting tools
Various paint brushes
Damp rag cloth for antiquing
Damp rag cloth for antiquing
Small bowl of water. (for smoothing clay)
Glitter (optional for some sparkle)
Spray matte sealer.

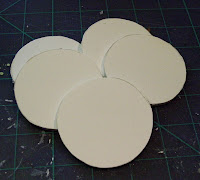
Step 1. Draw out the shape of your ornament and then CAREFULLY cut it out with your exact-o blade. I usually do several ornaments at a time so I'll draw and cut about 5 at a time.


Now you want to smooth the edges of your snake onto the surface of your ornament, shaping the mouth as you go along. Smooth all around the mouth shape to blend in.


Again, dip in water and then gently smoosh them close to the end of his mouth.

Smooth the cheeks out, like you did with the mouth. You can shape a grin line were the mouth and cheek meet just by pressing in and up a bit on the cheek.

Repeat for the other cheek. He's now starting to look like a happy snowman!


Step 3. Next, paint the carrot nose with orange.

Step 4. Cheeks and lips get a wash of light pink. I thinned the paint with water to give it a more watercolor like look.

Step 5. Next are the eyes. I painted the outer edge of the iris a darker blue than the main part. Just add a little black to your lighter blue to darken it a few shades.

Fill in the iris with the lighter blue. I also painted the pupils once the blue dried but forgot to take a picture of it. Now let all the paint dry. The next step will be antiquing and you want your base coats completely dry before you antique.

Step 6. Now comes the messy part. Be brave here, you're going to think you're ruining your ornament but fear not, it will turn out fantastic. If your brown paint is thick you'll want to thin it down a little. The paint needs to be sloppy and juicy but not watery. Start painting small areas and then wipe with damp cloth to remove most of the paint. What you're trying to do here is get the brown down into all those dents and cracks and stuff but wiping most of it off the surface.

OMG, I ruined it! ...... Just kidding. It has to go through the uglies to get to the pretties. What you'll do now is dry brush all your surfaces with their base coat colors ... white over white, pink over pink and so on. Don't know how to dry brush? Using a flat brush load it with your paint then on a paper towel wipe your brush till it has just a bit of paint on it. Then gently brush across the surface of your ornament with your "dry" brush. This will lay paint down on all the raised bits and leave the brown in all the dents and cracks. Keep dry brushing until you're happy with the colors.


Step 2. Next you'll need to cut your skewer or toothpick. You'll be using this as a support for the carrot nose so the length you want to cut it is just a tad shorter than the nose. I cut mine 1/4".

Step 3. Mark were you want your snowman's nose on your cutout. Don't worry about being exactly centered, unless that's where you want it. A little off center, higher or lower actually adds character to you snowman! :)
Now take your pencil and poke a hole for your skewer. You don't have to poke it all the way through.

Put a little dab of glue into the hole you made and then insert your little skewer bit. Now let it set for about 15 minutes to give the glue a chance to dry a bit.

Step 4. Time to make your hanger. Cut a piece of wire about 2 inches long and then bend it in half. I bent my wire over one of my sculpting tools so I would have a nice curve, you can use a pen, needle nose pliers or whatever else you have. You will then bend up the 2 cut ends to form little hooks. It should look like this when you're done.

Now insert the wire into the back of your ornament near the top. You'll want to line up the top of the wire a little lower than where you want it because when you poke in those two little hook ends you'll also push them upwards a bit so they can "hook" the foam core and give you a finished hanger that won't slip out of your ornament. Then put a little bit of masking tape over the back of the wire for a little bit more hold.

Time to play with PAPERCLAY!!!
Step 5. First you'll make two clay balls that will be rolled out about 1/8" thick. These will be the front and back of your ornament. These are about 1 1/2" wide but how much you need depends on the size of your ornament.

I like to use 2 skewers as guides so that my clay rolls out evenly. Kind of looks like a clay pancake ...... yum!

Step 6. After you roll out your 2 clay balls apply glue to one side of your ornament. This will help your clay stick while it's drying. You don't need much, just enough to cover the surface so just squeeze a little bit and spread with your finger.

Step 7. Now press one of your clay "pancakes" to the glued surface and begin smoothing the clay over the edge and removing the extra clay.

Repeat steps 6 and 7 for the other side of your ornament. Smooth out your seams along the edge but not so much that the clay becomes too thin there. Also remember that these are snowmen, they are made of snow, snow is not smooth ..... it's okay to have little bumps and dips and texture on the surface. In fact, those bumps and dips and things will look wonderful when you antique your ornament!

Step 8. Let's give this fellow a nose! Make a little ball of clay this time,

and then shape that into a carrot or cone shape.

Next, add a little glue to the wood skewer bit and then push your clay cone down onto the skewer.

Reshape the clay to give it a carrot shape, I bent the end of the nose a little to give it the look of the crooked end of a carrot.

You now want to make all those little creases and lines that are on a carrot so use a tool with a thin edge and gently push in your lines all over the carrot nose. You can use a sewing needle, a piece of wire, kitchen knife, whatever you have handy, as a tool to do this with. No need to have straight lines here either so have fun smooshing around the clay to get a look that you like.

You can let this dry for a few hours at this point, or continue adding the rest of his face. I let mine dry a bit so when I add the bits of his face I wouldn't knock his nose out of joint, (Har Har) or smoosh anything.
Step 9. Time to add a face! I like working on the mouth first so that's what we'll do now. Make a little clay snake, like so .....

Dip that little snake into your water, this will help it stick, and then place it on your ornament in the shape you want the mouth.

Now you want to smooth the edges of your snake onto the surface of your ornament, shaping the mouth as you go along. Smooth all around the mouth shape to blend in.

TaDa ..... what a grin!

Step 10. Make 2 balls for his cheeks.

Again, dip in water and then gently smoosh them close to the end of his mouth.

Smooth the cheeks out, like you did with the mouth. You can shape a grin line were the mouth and cheek meet just by pressing in and up a bit on the cheek.

Repeat for the other cheek. He's now starting to look like a happy snowman!

Step 11. Okay, let's add the rest of his face. Do this the same way you did steps 9 and 10.
Here's a chin. Use a pencil to make the dimple.

A pair of eyes .....

Little bags under the eyes ....

Some nice eyebrows ....

A little bit of snow on his nose. I added a dab of glue to the top of his nose before adding the clay to make it stick a bit more.

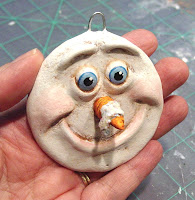
HURRAY! You have finished the sculpting part of your Snowman ornament. Now go hang him up somewhere and let him dry for a day or two. You'll want him to be completely dry before you paint him.
Grab your brushes ..... it time to PAINT!
Step 1. I like to give my work a coat of acrylic gesso before painting. You don't really need to do this but I feel it preps the surface for the paint and seals the piece a bit.

Step 2. After the gesso dries paint your ornament with white acrylic paint. Make sure to cover both front and back with white. Painted fingers are an option.

Step 3. Next, paint the carrot nose with orange.

Step 4. Cheeks and lips get a wash of light pink. I thinned the paint with water to give it a more watercolor like look.

Step 5. Next are the eyes. I painted the outer edge of the iris a darker blue than the main part. Just add a little black to your lighter blue to darken it a few shades.

Fill in the iris with the lighter blue. I also painted the pupils once the blue dried but forgot to take a picture of it. Now let all the paint dry. The next step will be antiquing and you want your base coats completely dry before you antique.

Step 6. Now comes the messy part. Be brave here, you're going to think you're ruining your ornament but fear not, it will turn out fantastic. If your brown paint is thick you'll want to thin it down a little. The paint needs to be sloppy and juicy but not watery. Start painting small areas and then wipe with damp cloth to remove most of the paint. What you're trying to do here is get the brown down into all those dents and cracks and stuff but wiping most of it off the surface.

OMG, I ruined it! ...... Just kidding. It has to go through the uglies to get to the pretties. What you'll do now is dry brush all your surfaces with their base coat colors ... white over white, pink over pink and so on. Don't know how to dry brush? Using a flat brush load it with your paint then on a paper towel wipe your brush till it has just a bit of paint on it. Then gently brush across the surface of your ornament with your "dry" brush. This will lay paint down on all the raised bits and leave the brown in all the dents and cracks. Keep dry brushing until you're happy with the colors.

Step 7. If you like a little sparkle you can dab some glue on the snow on the nose and then sprinkle on your glitter. Press lightly with your finger to make sure the glitter is stuck in the glue. Now let it all dry. Once dry spray entire ornament with spray matte sealer. Now sit back and enjoy your new ornament!

Subscribe to:
Posts (Atom)
LinkWithin
