My Art Doll Ferdinand has been published in the summer edition of Art Doll Quarterly. It is such an honor to have my art included with so many talented artists in such a wonderful magazine.
Showing posts with label paperclay. Show all posts
Wednesday, May 31, 2017
Thursday, October 13, 2016
Frankenstein finished
I finally got the last sculpture my collector wanted finished. He's on his way to her, I sure hope she likes him.
Monday, April 11, 2016
New Sculpture on Phatt
I have a new figurine listed on Phatt this month. His name is Ferdinand and he's a paperclay sculpt. I carved his beanie cap's propeller from wood and it really spins!
http://www.pfattmarketplace.com/tiltedasylum.html
Thank you for looking.
http://www.pfattmarketplace.com/tiltedasylum.html
Thank you for looking.
Wednesday, January 27, 2016
Bunny Easter eggs using Creative Paperclay.
Today's work table .... Bunny Easter eggs sculpted in Creative Paperclay.
I'll be uploading a how-to video later today.
Thursday, October 9, 2014
Reaper takes a holiday art doll
Finally finished this fellow. He was a stubborn one, gave me plenty of headaches ... lol
"Reaper takes a holiday" is a paperclay sculpt and he stands 14" to the top of his ghost balloon.
You can see more pictures of him in my Etsy shop. Go ahead and look .... you know you want to. :)
"Reaper takes a holiday" is a paperclay sculpt and he stands 14" to the top of his ghost balloon.
You can see more pictures of him in my Etsy shop. Go ahead and look .... you know you want to. :)
Tuesday, September 9, 2014
Finished several Halloween pieces
I finished a few of my Halloween sculpts. Two of them are an introduction to my new collection Pumpkanoggins.
Pumpkanoggin: The Magician
Pumpkanoggin: I feel a draft!
Screaming Candle
I will be posting these in my Etsy shop today.
Friday, July 18, 2014
Playing in clay, AGAIN!
This last two years have just been crazy for me, haven't made art as much as I want. Well, that's changing! I've told EVERYONE in this house that I will be spending most of my waking time sculpting, painting and (hopefully) making videos. I really don't want to be what everyone thinks I should be, I want to be ME, and me is a bit wonky and wants to spend my time with art. With that said I have been working on some new pieces and I just happen to have a few photos to show ya ...
Love having WIP's on my table and am LOVING playing with clay these days!
Sunday, October 27, 2013
Mortimer found a home!
What a pleasant surprise! Late last night, before I went to bed, I checked my email and saw a notice that I had a sale. So I'm thinking, "Cool, someone must of bought an ornament." I opened the email and saw the amount of the sale and thought, "What the hell did I have in my shop for that price?" (yes, I was that tired) HOLY MOLLY, it was a doll! WOOHOO, I sold a doll! I was so excited that I couldn't go to bed and ended staying up a few more hours.
Thank you to my buyer, you ROCK and you made my day!
Wednesday, October 9, 2013
Kitty, kitty and another kitty
I've been working on ornaments again, this time Christmas kitties. Here are my 3 newest ones:
You can them them in my Etsy shop If you have a kitty you love and would like an ornament painted to look like your pet please let me know as I am taking orders for them. Price for a custom painted ornament is the same as the ones in my shop.
Monday, October 7, 2013
Better watch out when you stick your hand in the treat bowl to grab some Halloween sweets because you never know what may be lurking at the bottom of that bowl ....... bwahahaha!
You can find this creepy sweet in my Etsy shop.
Saturday, October 5, 2013
What's on my table
I have several pieces going at the same time but then, don't we all? Today I've been working on the base of this evil jester. I'll have to let it dry a bit so I can do a little carving on the diamonds and that going to be a trick on a cold, rainy day like today. Hmmm, I have my stove self cleaning right now, maybe I'll set him on the stove top and see if that helps.
So, what are you working on?
Tuesday, September 10, 2013
Snowmen Christmas ornaments
I've been playing with clay and glitter and here are a few of the end results. All done in paperclay and ready to come decorate your home for the holidays!
You can find them in my Etsy shop.
Monday, September 9, 2013
Christmas Brown bear ornament
Just posted a new Christmas ornament to my Etsy shop. I added red and gold glitter to its ribbon collar and I really think it adds a great look to my work. I will definitely be adding glitter to more pieces in the future.
Thanks for stopping by!
Wednesday, August 28, 2013
Getting ready for Halloween with new ornaments
I've just posted lots of new Halloween ornaments to my Etsy shop. Here are a few of them. Hope you'll pop in and look around, you might find something you just can't live without. :)
Saturday, June 23, 2012
Mortimer ooak ghost art doll
This doll was a real challenge for me. I've never worked with cheesecloth for clothing before and it's very difficult to use but so right for giving a ghostly appearance to this doll. I'm very pleased with how he turned out and a bit relieved that I don't have to fight that cheesecloth again. At least not until my hair-brained muse insists that I do!
You can see more images and purchasing information at my Etsy Shop.
SOLD
You can see more images and purchasing information at my Etsy Shop.
SOLD
Saturday, May 19, 2012
Snowman ornament video
I've been wanting to put together a video of a few of my snowman ornaments and I finally got it done. I really do like making videos, the only part that is hard is finding music that's free to use. So many sites out there have royalty free music, or so they tell you in big bold letters but when you look at their fine print it's not free at all. I did come across a few composers that do offer free music, as long as you give them credit and a link to their sites on your video. I am more than happy to do that for them.
Here's the link on my Youtube channel. If you like it would you mind giving me a thumbs up. I'd also like to know what you think of it so if you'd like a message on my video would be great! Thanks for looking at it.
Sunday, January 15, 2012
Creative Paperclay® Heart pendant
My newest tutorial using Creative Paperclay®
Thanks for stopping in and I hope you enjoy the tutorial.
Material list:
Creative Paperclay®
wire - for the bail
tool to stamp in your texture
acrylic paints
1. Make a paperclay ball, about the size of a walnut. Actually, the amount of clay you use really depends on the size you want your finished piece so play around. If you use too much simply make the ball smaller and reshate again.
2. Start shaping the clay into a heart. I first roll the ball in my hands to form a cone shape and then squish and moosh the clay into a heart shape. This is play time so have fun and don't worry if your heart isn't a perfectly shaped heart. I kinda like the wonky look, I think it gives the pendant more character.
3. Insert your wire bail into the top of your pendant. Since mine is a wonky heart I inserted the bail so the heart will hang at an angle
4. Next we stamp in our texture. I used a leather stamping tool for my texture but you can use whatever you have handy. Stamp the texture deep enough to make it look like it's inside the heart, not on the surface of the heart.
5. Once you get the look you like let the pendant completely dry. What? We're done? Yep, how easy is this! :)
6. After it dries completely you can paint it . I started by painting the entire pendant black. I then dry-brushed metalic gold and red. That gives the pendant an aged look that I love. After the paint dried I sprayed a couple of layers of polyurathane on it to protect the paint. All that's left to do is sting it on a cord or ribbon and you have a beautiful heart to wear.
Thanks for stopping in and I hope you enjoy the tutorial.
Material list:
Creative Paperclay®
wire - for the bail
tool to stamp in your texture
acrylic paints
1. Make a paperclay ball, about the size of a walnut. Actually, the amount of clay you use really depends on the size you want your finished piece so play around. If you use too much simply make the ball smaller and reshate again.
2. Start shaping the clay into a heart. I first roll the ball in my hands to form a cone shape and then squish and moosh the clay into a heart shape. This is play time so have fun and don't worry if your heart isn't a perfectly shaped heart. I kinda like the wonky look, I think it gives the pendant more character.
3. Insert your wire bail into the top of your pendant. Since mine is a wonky heart I inserted the bail so the heart will hang at an angle
6. After it dries completely you can paint it . I started by painting the entire pendant black. I then dry-brushed metalic gold and red. That gives the pendant an aged look that I love. After the paint dried I sprayed a couple of layers of polyurathane on it to protect the paint. All that's left to do is sting it on a cord or ribbon and you have a beautiful heart to wear.
Sunday, December 11, 2011
Polar Bear Christmas ornament
Just posted my newest ornament, "Merry Christmas Polar Bear" I debated whether or not to add the collar, I'm glad I did! :)
Price is $25.00 + shipping
You can purchase this or one of my other creations at my Etsy shop
Tuesday, November 15, 2011
Thanksgiving Turkey Pin Tutorial
Good Morning everyone! Today my first "official" tutorial as a member of the Creative Paperclay® Design Team posted.
Hope you have fun trying my tutorial.
Supplies you'll need:
Creative Paperclay®
Craft Glue
Black bead for eye. (I used a black onyx round bead)
Pin Back
Your sculpting tools
Something to roll the clay out with
Paint brushes
Acrylic paints (I used French Vanilla, Dark Brown, Black and Metallic Copper but feel free to choose the colors you like!)
Water
Strong Glue for pin back (I use E-6000)
Protective Urethane spray
Okay, let's play!
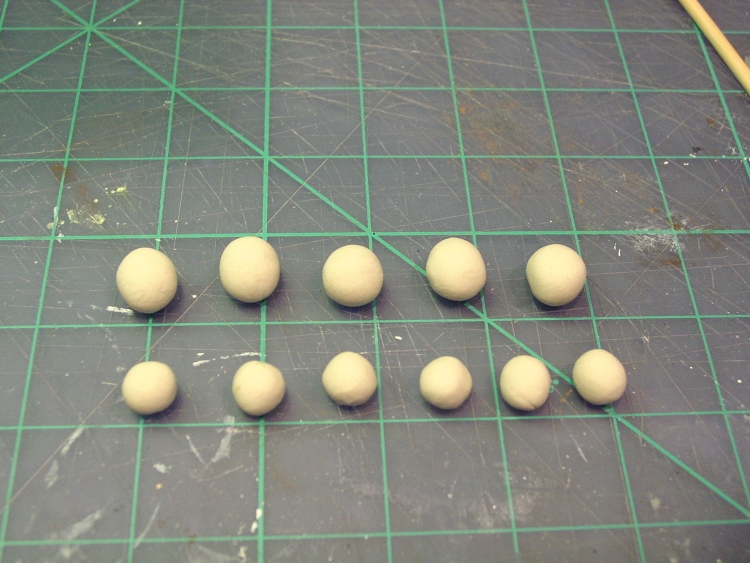
Step 1. Grab about a golf ball size of clay and role it out to about 1/8 inch thick. I use bamboo skewers to rest my roller on while rolling out the clay. Next, cut out 11 circles to make the tail feathers with. If you look at the picture you can see I used what looks like some really nice cutters. What they are are those brass candle stick inserts you use to help keep wax off the lip of your candle sticks. You can find them in several sizes and they come in a pack of 5 or six. They work great are are inexpensive clay cutters! Or you can eye ball it and make 5, 1/2 inch balls and 6, 1/3 inch or so.
Hope you have fun trying my tutorial.
Supplies you'll need:
Creative Paperclay®
Craft Glue
Black bead for eye. (I used a black onyx round bead)
Pin Back
Your sculpting tools
Something to roll the clay out with
Paint brushes
Acrylic paints (I used French Vanilla, Dark Brown, Black and Metallic Copper but feel free to choose the colors you like!)
Water
Strong Glue for pin back (I use E-6000)
Protective Urethane spray
Okay, let's play!
Step 1. Grab about a golf ball size of clay and role it out to about 1/8 inch thick. I use bamboo skewers to rest my roller on while rolling out the clay. Next, cut out 11 circles to make the tail feathers with. If you look at the picture you can see I used what looks like some really nice cutters. What they are are those brass candle stick inserts you use to help keep wax off the lip of your candle sticks. You can find them in several sizes and they come in a pack of 5 or six. They work great are are inexpensive clay cutters! Or you can eye ball it and make 5, 1/2 inch balls and 6, 1/3 inch or so.
Step 2. Now take all those nice clay balls and roll them into cone shapes about 1 1/2 inches long.
Step 3. Lay all your clay cones out into the shape of the tail feathers and gently flatten a bit. Don't worry if the bottoms don't match, you're going to trim them next.
Step 4. Now trim the bottoms of your feathers to make a nice curved arch.
Step 5. Time for a bit a detail. You can use a toothpick or a tool with a straight edge to add details to the tail feathers. Don't push all the way through the clay, you just want the lines deep enough to hold onto the dark brown paint later. Now let the tail feather dry a bit, you don't want to squish out all your lovely work.
Step 6. After the tail feathers have dried a bit it's time to add the rest of the turkey. Make a ball of clay a little bit smaller than the size you want the body. Before pressing it in place, brush a little bit of craft glue along the bottom edge of the feathers to help the body stick. Now press the ball in place and shape it till you like the way it looks.
Step 7. I added feather details to the body with a silicone tipped sculpting tool but you can use a piece of wire bent into a U shape to stamp feather impressions into the body.
Step 8. Next we'll make the turkey's neck, head and the wattle. The WHAT? LOL. The wattle is that hangy down thingy on the turkey's beak and neck. (I didn't know either so I looked it up!) Just make a snake shape, give it a little curve, paint a little glue on the back and press in place. The head is a flattened ball of clay with one edge pinched out a little for his beak. The wattle (teehee) is a tear shape press in place. Don't forget to paint a little glue on the back of each piece before pressing into place.
Step 9. Here's lookin at ya! Add a little glue to your bead and press it into the head.Now let this all dry. If you're like me and you can't stand to wait a few hours do what I do. Warm your oven to 200 degrees. Turn oven off, place your turkey pin in oven on something flat, like a cake pan and leave in oven till dry. Keep an eye on it though, in case it starts to crack or bend.
Step 10. Now that your pin is dry you can add the nice smooth bottom. Roll out a chunk of clay to about 1/8 inch. Paint glue all over the back of your pin and then gently press the turkey onto the rolled out clay. Trim all the extra clay away from the pin and smooth the edges. Let dry again.
Step 11. Once your pin is completely dry you can paint it in the colors of your choice. Once your paint is dry, thin your dark brown paint just a little with water and then paint over small sections at a time, making sure you get it into all those wonderful details. Gently wipe off with a damp cloth or sponge before it dries. I use a makeup sponge for this. They work great and are soft enough that they don't pull of any of the other dried paint. This helps pop out your details.
You can spray a protective coating on your pin after it is completely dry. I used a matte finish by Krylon.
I hope you enjoyed my Thanksgiving Turkey Pin tutorial. I had fun creating it for you!
Subscribe to:
Posts (Atom)