

Showing posts with label jewelry. Show all posts
Showing posts with label jewelry. Show all posts
Monday, October 3, 2016
Fall Blog Sale - October 15
I will be having my Fall Blog Sale next Saturday October 15, 2016. Please stop on by and see all the goodies I will be posting.


Tuesday, January 26, 2016

Wednesday, September 30, 2015
New art and an update
Well, here it is almost a year since my last post. Life has had it's ups and downs and during that time I really wasn't able to produce much art. I am glad to say the health concerns are much better and I'm back at my work table finishing long overdue projects and creating new art.
For some time I've been wanting to try my hand at sculpting bracelets. I finished this one and was pleasantly surprised that it sold right away and another buyer ordered one as well. This bracelet is 100% polymer clay and it's all about fall and its wonderful colors.


For some time I've been wanting to try my hand at sculpting bracelets. I finished this one and was pleasantly surprised that it sold right away and another buyer ordered one as well. This bracelet is 100% polymer clay and it's all about fall and its wonderful colors.


Thursday, June 28, 2012
Zombie Monster head pendant
Yet another creepy, kinda funny zombie pendant. (I think my family thinks I've finally lost my mind ... lol)

Toofy, zombie monster pendant

Toofy can be found hanging out in my Etsy Shop
Sunday, June 24, 2012
Beautiful Heart pendant
I'm a busy, busy lady these days. I just listed another pendant, this time it's a beautiful heart.

Can be found in my Etsy Shop.

Can be found in my Etsy Shop.
Steampunk Heart pendant
I love steampunk! Bet you already new that about me, didn't you.
I recently got this sun cured resin that I've been itching to try so I sculpted this steampunk heart pendant, cut and smooshed out a space for the watch gears and then after baking and painting the pendant I tried out the resin. I LOVE this resin! I've also used it to give my doll's eyes a nice watery look that you just can't beat. The resin is Gel du Soleil. It's a bit pricey but a little goes a long way.

You can find this pendant in my Etsy Shop
Thursday, May 24, 2012
Zombie video and I'm excited!
I just uploaded my newest video to YouTube. It showcases some of my Zombie jewelry.
Okay, that's cool but what am I so excited about? I'm excited that the extremely talented group known as Midnight Syndicate gave me permission to use their song "Grisly Reminder" from their album, "The 13th Hour." in my video and that is most definitely cool! They have also invited me to submit myself to their Legions of the Night site so their fans can find me. Yeah, I'm excited!
Tuesday, November 15, 2011
Thanksgiving Turkey Pin Tutorial
Good Morning everyone! Today my first "official" tutorial as a member of the Creative Paperclay® Design Team posted.
 Hope you have fun trying my tutorial.
Supplies you'll need:
Creative Paperclay®
Craft Glue
Black bead for eye. (I used a black onyx round bead)
Pin Back
Your sculpting tools
Something to roll the clay out with
Paint brushes
Acrylic paints (I used French Vanilla, Dark Brown, Black and Metallic Copper but feel free to choose the colors you like!)
Water
Strong Glue for pin back (I use E-6000)
Protective Urethane spray
Okay, let's play!
 Step 1. Grab about a golf ball size of clay and role it out to about 1/8 inch thick. I use bamboo skewers to rest my roller on while rolling out the clay. Next, cut out 11 circles to make the tail feathers with. If you look at the picture you can see I used what looks like some really nice cutters. What they are are those brass candle stick inserts you use to help keep wax off the lip of your candle sticks. You can find them in several sizes and they come in a pack of 5 or six. They work great are are inexpensive clay cutters! Or you can eye ball it and make 5, 1/2 inch balls and 6, 1/3 inch or so.


Supplies you'll need:
Creative Paperclay®
Craft Glue
Black bead for eye. (I used a black onyx round bead)
Pin Back
Your sculpting tools
Something to roll the clay out with
Paint brushes
Acrylic paints (I used French Vanilla, Dark Brown, Black and Metallic Copper but feel free to choose the colors you like!)
Water
Strong Glue for pin back (I use E-6000)
Protective Urethane spray
Okay, let's play!


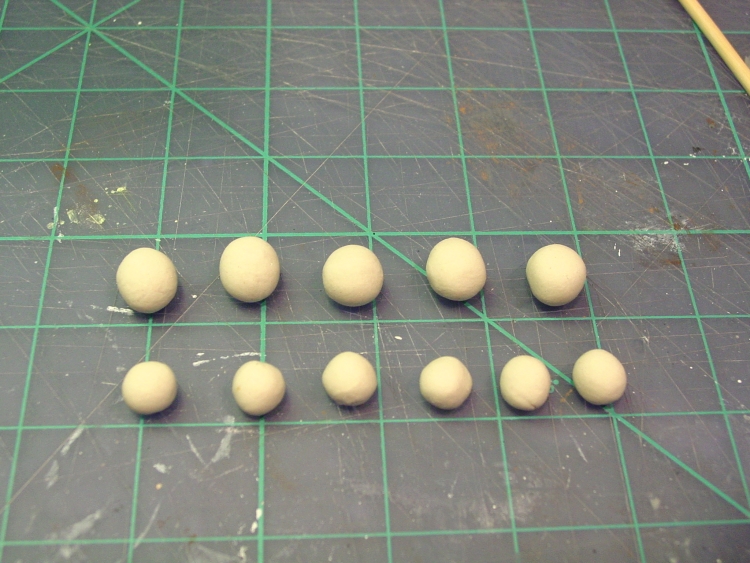
Step 2. Now take all those nice clay balls and roll them into cone shapes about 1 1/2 inches long.

Step 3. Lay all your clay cones out into the shape of the tail feathers and gently flatten a bit. Don't worry if the bottoms don't match, you're going to trim them next.

Step 4. Now trim the bottoms of your feathers to make a nice curved arch.

Step 5. Time for a bit a detail. You can use a toothpick or a tool with a straight edge to add details to the tail feathers. Don't push all the way through the clay, you just want the lines deep enough to hold onto the dark brown paint later. Now let the tail feather dry a bit, you don't want to squish out all your lovely work.

Step 6. After the tail feathers have dried a bit it's time to add the rest of the turkey. Make a ball of clay a little bit smaller than the size you want the body. Before pressing it in place, brush a little bit of craft glue along the bottom edge of the feathers to help the body stick. Now press the ball in place and shape it till you like the way it looks.


Step 7. I added feather details to the body with a silicone tipped sculpting tool but you can use a piece of wire bent into a U shape to stamp feather impressions into the body.

Step 8. Next we'll make the turkey's neck, head and the wattle. The WHAT? LOL. The wattle is that hangy down thingy on the turkey's beak and neck. (I didn't know either so I looked it up!) Just make a snake shape, give it a little curve, paint a little glue on the back and press in place. The head is a flattened ball of clay with one edge pinched out a little for his beak. The wattle (teehee) is a tear shape press in place. Don't forget to paint a little glue on the back of each piece before pressing into place.


Step 9. Here's lookin at ya! Add a little glue to your bead and press it into the head.Now let this all dry. If you're like me and you can't stand to wait a few hours do what I do. Warm your oven to 200 degrees. Turn oven off, place your turkey pin in oven on something flat, like a cake pan and leave in oven till dry. Keep an eye on it though, in case it starts to crack or bend.

Step 10. Now that your pin is dry you can add the nice smooth bottom. Roll out a chunk of clay to about 1/8 inch. Paint glue all over the back of your pin and then gently press the turkey onto the rolled out clay. Trim all the extra clay away from the pin and smooth the edges. Let dry again.


Step 11. Once your pin is completely dry you can paint it in the colors of your choice. Once your paint is dry, thin your dark brown paint just a little with water and then paint over small sections at a time, making sure you get it into all those wonderful details. Gently wipe off with a damp cloth or sponge before it dries. I use a makeup sponge for this. They work great and are soft enough that they don't pull of any of the other dried paint. This helps pop out your details.
You can spray a protective coating on your pin after it is completely dry. I used a matte finish by Krylon.


I hope you enjoyed my Thanksgiving Turkey Pin tutorial. I had fun creating it for you!
Friday, October 1, 2010
Yar me mateys!
I got a commission to make a bunch of pirate pins and was given free hand at designing them. Only request was colors and make each unique. This is what I created and the buyer was thrilled when she got them. They look so much better in person.

Now I am working on the other half of her order but I'm not telling till I get them all done! ....... snicker

Now I am working on the other half of her order but I'm not telling till I get them all done! ....... snicker
Monday, August 2, 2010
2 New Heart Necklaces
I've had a few requests to make more of my Love Bites heart pendants so here are 2 that I just put up for sale.
Ebay listing - Love Bites 4

Etsy listing -Love Bites 3

Ebay listing - Love Bites 4

Etsy listing -Love Bites 3

Tuesday, February 9, 2010
Steampunk Broken Heart
Just finished another heart pendant. I'm still not happy with the pictures I'm getting and now I'm wanting to tear down my photo box and build a new one ... lol


You can find this in my Etsy shop


You can find this in my Etsy shop
Monday, February 8, 2010
Melting Heart pendant
Just finished a few heart pendants. This is the only one I got a half decent picture of. Hubby was using my camera the other day to take pictures of the snow in our yard and he changed a few settings. Lol, now I have to remember how I had it set up. Oh well ..... such is married life!

It's polymer clay with sterling silver wire for hanging. The little ice crystal is a real glass bead that I have custom made to use in my art. They are the cutest things and I love working with them.
You can find this in my Etsy shop

It's polymer clay with sterling silver wire for hanging. The little ice crystal is a real glass bead that I have custom made to use in my art. They are the cutest things and I love working with them.
You can find this in my Etsy shop
Friday, November 6, 2009


Tuesday, October 27, 2009
Vampire heart pendant
Ok, so the creepy muse still has her way. Here is my new pendant "Make you Mine".

Can be found dripping blood all over my Etsy shop.
Sold

Can be found dripping blood all over my Etsy shop.
Sold
Feeling a bit like Winter
It's been much colder in the morning this last week and although I know Halloween is still a few days away I'm starting to feel a bit wintery. So I've started working on a few winter themed creations while finishing up a few spooky pieces. I'll still be creating the creepy stuff during the year but Christmas is starting to tug at me now.
Here's my newest pendant, "Winter Nap" Okay, I know it's not Christmas but it's snowy and it's got a polar bear and Santa loves polar bears and that's my story so I'm sticking with it! :)

You can find "Winter Nap" in my Etsy shop.
Here's my newest pendant, "Winter Nap" Okay, I know it's not Christmas but it's snowy and it's got a polar bear and Santa loves polar bears and that's my story so I'm sticking with it! :)

You can find "Winter Nap" in my Etsy shop.
Wednesday, October 21, 2009
Frankenstein Zombie pendant
A new pendant - Frankenzombie! Two of the best monsters all rolled up in one. An eternal hunger for brains and big enough to get what he wants. RUN FOR YOUR LIVES!!! teehee


Can be found in my Etsy Shop


Can be found in my Etsy Shop
Thursday, October 8, 2009
Pumpkin barrel bead pendant
I'm really happy with the way this pendant turned out. It's done in polymer clay and has antiqued copper wire bails. It's 2 1/2 inches from top bail to bottom pumpkin leaf. The whole thing, including the wires, is protected with a polycrylic varnish. Since the barrel is hollow it's actually very light and comfortable to wear.
These barrel beads are a challenge to make but I sure do like the results.


Can be found in my Etsy Shop
These barrel beads are a challenge to make but I sure do like the results.


Can be found in my Etsy Shop
Tuesday, September 8, 2009
New Zombie pendants
Yay, I got my camera to work again. Here's hoping I can get pics of the rest of my pieces but until then here is the first of 3 new zombie head pendants that I sculpted.
He's made from polymer clay. I'll be listing him in my Etsy store later today.


UPDATE: Got decent pics of #2 for today. Going to take a nap since I'm fighting a 4 day old bug and am just suddenly feeling very worn out.


He's made from polymer clay. I'll be listing him in my Etsy store later today.


UPDATE: Got decent pics of #2 for today. Going to take a nap since I'm fighting a 4 day old bug and am just suddenly feeling very worn out.


Subscribe to:
Posts (Atom)
LinkWithin
